It’s been a while I have written. Meanwhile I am again working my way through started and unfinished electronics projects of mine. One of these unfinished projects was the adaptation of a Yaesu MH-48 Microphone to the 817 QRP transceiver.
A while ago I had bought two used Yaesu radios on ebay. The seller only included one microphone for both and did not respond to me when I asked for the other microphone. So I went back on ebay and bought a random Yaesu microphone with a “modular jack”, assuming it will simply fit.
Boy was I wrong !
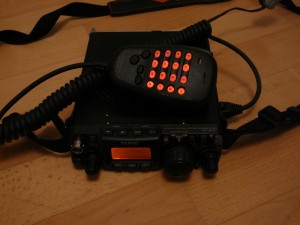
So I got a MH-48 DTMF Microphone that does not work with the FT-817 at all. But of course I wanted a working microphone. At best not having to buy a new one.
As I looked back into the accessory list of the FT-817 and saw that the DTMF microphone that specifically works with the 817 is the MH-36E8J.
On the quest to adapt the MH-48 so that it works I found it’s schematics and also looked for the schematics of the MH-36, but could not find any for it directly. From what I found, it seems like the DTMF tones in the MH-36 are generated by an IC for that purpose, whereas the MH-48 is just a bunch of passive switches and some transistors. There is nothing in there that could generate the frequencies for DTMF so I guess they are generated in the specific transceiver itself. This leads to the conclusion that full functionality can only be restored by a major modification. I did not really have the wish to start a bigger thing, I just wanted the basic functions of a microphone so I can use it with the radio.

Even the basic functions were a little bit more complicated than I thought. Some simple rewiring of the microphone at the jack was not enough. The PTT path in the MH-48 microphone has a 15K resistor and a diode. This prevented the TRX to switch to Transmit mode. So I simply shorted both with a tiny piece of wire. The TX-LED on the microphone still works with this little change.
The electred microphone had all the circuitory it needs to generate audio, I did not touch any of those. At this point I already had what I wanted, the very basic functionality of a handheld PTT-microphone. Then I tried to randomly push the other keys on the microphone. Just to see if anything would happen. I figured that both the top keys for up and down set the frequency one step higher when they were pushed. Since this was somewhat awkward I also wanted the down button to work.

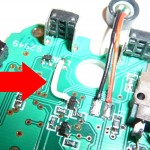
I looked back into the schematics of the MH-48, I figured I would only need minimal changes for the other one to work. I removed the doulbe diode package that is connected to the down button. Then I got my multimeter and measured random points in the vicinity of that place and found a pad where the down signal is connected to. I shorted those two points with a short wire and I had a working down button. Unfortunately later I also discovered that the first row of the DTMF keys did the same thing, on press they lower the frequency one step. Well, If I ever open the microphone again I might look into that for now it will remain as it is.
Since the backlight of the DTMF keys is directly between supply voltage and ground the lights work when I use the switch. No modification needed for that, but it is pretty useless as long as the keys themself have no function.
As much as I also wanted to have the “fast” button, there were no wires left in the cable. The microphone is designed for a completely different radio.The cable has 6 wires that go directly into a 6 pin modular jack, whereas the FT-817 has a 8-pin port and uses all 8-pins. To figure which one does what I have disassembled the one MH-31 microphone that was delivered with the two radios. There are schematics of that one on the Internet if you need further info.
To conclude, I have now a modified MH-48 DTMF microphone, that I bought falsely because I was to lazy to realize that there are slightly different versions on the market.


